|
Blogging in the
21st edCentury
|

|
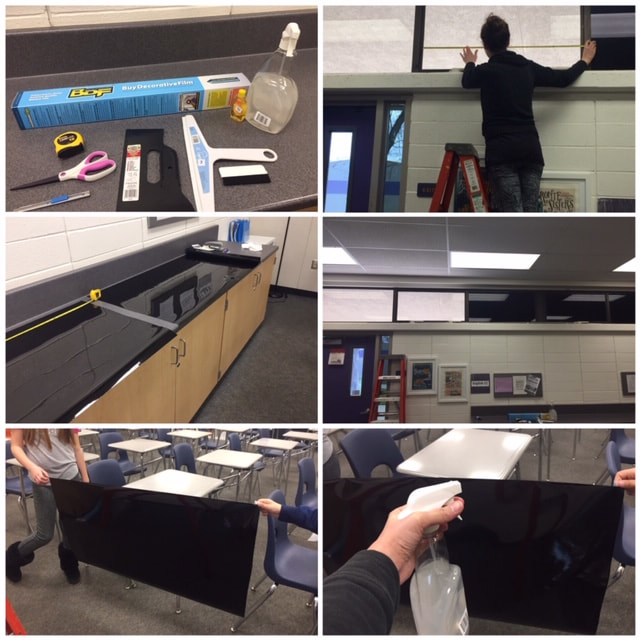 Teaching is so much more than mastering lesson design: Sometimes it involves making low level changes to the composition of the room that you were originally given. As the year progresses, you notice certain things that can take away from your lessons, like too much glare from the sun on your Smartboard. Although I usually love natural light, the sunlight from the windows makes the material I project difficult to see. I ordered some blackout tint from Amazon, enlisted the help of my children, and got to work.
You need a few tools to get started: Scissors, a box cutter razor, tape measure, straight edge, water bottle, baby shampoo, and squeegee. Once you have all your tools, you'll prepare a mixture of baby shampoo and water in the water bottle (the tint will have the directions regarding the ratio of shampoo to water). Cut the tint to fit your window leaving about an extra inch or two on each side. Hopefully, you can employ the help of some munchkins, like I did to hold the tint while you peel plastic film off the sticky side. Be careful not to drop it (like I did more than once) because it will get ruined. After peeling the film, you'll spray the sticky side with the shampoo-water mixture. Then spray the window with the same mixture and place the film on the window. Use the squeegee working your way from the center towards the edges to eliminate any water bubbles and smooth out the film. Next, you'll get your plastic straight-edge and line it up against the frame of the window. Use your sharp box cutter razor to cut the film along the straight edge. After you're finished trimming the edges, use the squeegee to smooth out any remaining bubbles, working from the center to the edges. Stay tuned for my next practical blog post when I show how to set-up surround sound in your classroom:) #tintyourclassroom #windowtint #classroomimprovement #reduceglare
4 Comments
 After attending the #FallCUE Conference in American Canyon, CA this past weekend, I was inspired by the #Hyperdocs workshop that I attended. They taught me how they present lessons using hyperlinks with a focus on Universal Design for Learning. The focus was on packaging a well-designed lesson that moves students strategically through the components of effective lesson design while offering them choices for input of information, as well differentiation built -in for our different learning types, AND offering choices for assessment. Of course, I couldn't wait to get started using #Hyperdocs in my English 12 class this week. I took our Study Sync Essential Question for the quarter and developed a lesson that allowed students to answer the question using their personal background information, then allowed them to explore a variety of sources that discuss that topic, further respond to the topic using their new "insight," and lastly curate a list of 5 songs that express a response to the essential question. Thank you for the package in which to design a well-planned learning experience for my students @lhighfill @kellyihilton @saralandis For more information and resources, check out their book THe Hyperdoc Handbook
The assessment component came straight from another great workshop I attended this weekend called Cue the Remix: Integrating Design Thinking and ELA. Their 5 song playlist idea was phenomenal! Thank you @trustahoodlum @Chclteteacher @weberswords #theintelligenthoodlums |
Janée
|
 RSS Feed
